
The cursor should be flashing at the first character of the Title: field. We don't really want to change anything on the generic Source Record section, but we do want to add all the Citation-specific Details.
We need to tab over all the Source details until we get to the date field.
On the next line type {tab*7}
press the enter key on your keyboard to get to the next line
We can now enter the date, ie today's date, when we created this fact and citation. Click on the Insert Field button at the left of the template
In the Insert Field Reference, click the down arrow in the drop down and select Page.Access Date, and click the Insert button.
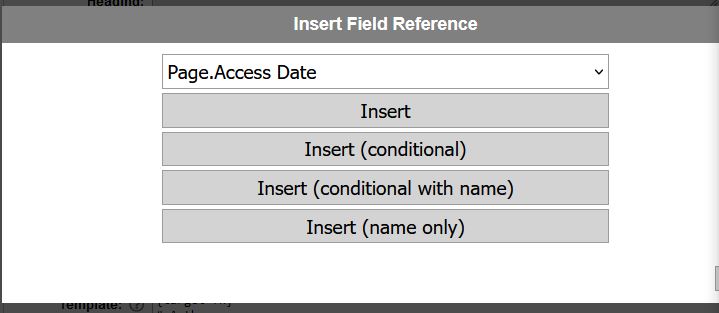 That will add the correct reference for today's date as [Page.Access Date]
On the next line type {tab} to get to the next field. Now we want to enter the website URL as where we found the record. Again, use the Insert Field button, scroll down and select URL and Insert. This will write the [URL] field.
On the next line type {tab}{down*4}{tab} which will set the Assesment to Secondary and move on to the Notes section.
In the Notes we can put all the other relevant info that you may need to keep to reference this citation. I suggest adding the following lines, as per:
[Source.Collection]{enter}
FHL Film Number(s) : [Source.Digital Folder Number]{enter}
Image Number : [Source.Image Number]{enter}
[Source.Citation]{enter}
[Event Type] : [Event Date]{enter}
Name ; [Name]{enter}
Father : [Father Name]{enter}
Mother : [Mother Name]{enter}
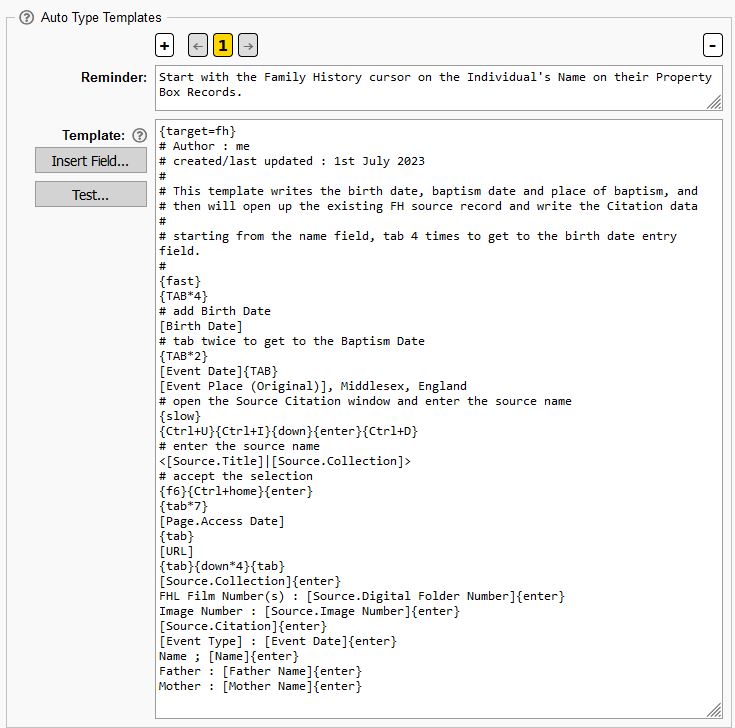
Your final autotype template should look like this:
That will add the correct reference for today's date as [Page.Access Date]
On the next line type {tab} to get to the next field. Now we want to enter the website URL as where we found the record. Again, use the Insert Field button, scroll down and select URL and Insert. This will write the [URL] field.
On the next line type {tab}{down*4}{tab} which will set the Assesment to Secondary and move on to the Notes section.
In the Notes we can put all the other relevant info that you may need to keep to reference this citation. I suggest adding the following lines, as per:
[Source.Collection]{enter}
FHL Film Number(s) : [Source.Digital Folder Number]{enter}
Image Number : [Source.Image Number]{enter}
[Source.Citation]{enter}
[Event Type] : [Event Date]{enter}
Name ; [Name]{enter}
Father : [Father Name]{enter}
Mother : [Mother Name]{enter}
Your final autotype template should look like this:
 and if it worked successfully, you can go back and change the {slow} to a {fast}, and pat yourself on the back!
What you may want to do, is to click the Export Settings button at the top of the ORA Settings screen to make a back up, and then to review what we have done, and adapt any of the navigation steps, ie the number of {tab}s, etc to suit your layouts in Family Historian. If you somehow 'mess it up', you can Import those Settings to get back to your working templates. You can also print off a report by clicking the Collection Report, so you can have a seperate screen or print copy.
and if it worked successfully, you can go back and change the {slow} to a {fast}, and pat yourself on the back!
What you may want to do, is to click the Export Settings button at the top of the ORA Settings screen to make a back up, and then to review what we have done, and adapt any of the navigation steps, ie the number of {tab}s, etc to suit your layouts in Family Historian. If you somehow 'mess it up', you can Import those Settings to get back to your working templates. You can also print off a report by clicking the Collection Report, so you can have a seperate screen or print copy.
| Previous | Back to the beginning |