Building the Autotype template
We are going to do this step by step, using the ORA and Family Historian navigation key strokes.
Open up a new Browser tab by clicking the ORA Setting button on the browser, and as a tip, drag that tab off onto the desktop so you can see the website, and have the ORA Settings side by side. Remember to close that tab before you close your main browser or you may loose all the tabs and have an 'empty' browser next time you start.
A few points to note before we start:
ORA does not know anything about Family Historian, and cannot tell if the cursor is in the wrong place, or if a field already had data in it.
I would suggest that you try all this on the Family Historian Sample Project, or a 'test' project of your own.
Therefore it cannot make any decisions, right or wrong, based on the Field layouts or commands that we give it.
A # at the beginning of any line in the Text Templates, AutoType Templates, or Library templates is an indicator that anything following it on that line is a comment, and is ignored by the ORA Settings processor.
It is good practice to comment on what 'active' lines of code in a template do (helps you to remember and others to follow what you did!)
It is good practice to click the Export Settings button before scripting. It makes a backup of all the Collections and libraries, etc. If your coding goes 'pear-shaped', you can always re Import the settings to get back to where you were before the backup.
Keep it simple to start with. Once it works, you may find easier or better ways to do the same template, and you can improve them when they work
Use the Test buttons on the text and autotype settings to show you what it is doing/producing, before you click the AutoType button to run your template to actually update your Family Historian records. You can always use the Family Historian Edit->Undo to back out of a failed template!
Don't try to write the whole template before testing and trial - take it step by step.
Refer to the ORA website for special commands and how they work - https://www.ora-extension.com/en/contents.htm or use a google search - site:ora-extension.com what you seek or keywords
On your ORA Settings page, click the + to add the first autotype template:Green writing is what you should type
Write something in the reminder box, like, Start with the Family History cursor on the Individual's Name on their Property Box Records. ( ie at the end of Matilda's name) You can always come back to this field and add extra reminder lines.
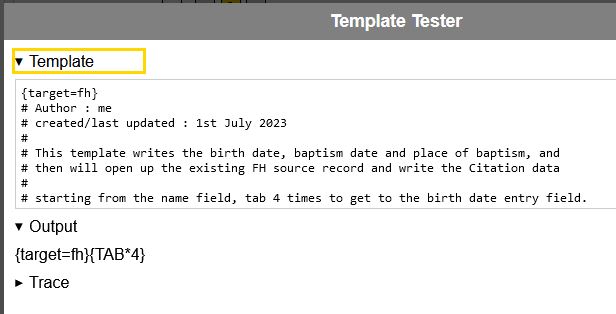
In the first line of the Template, type {target=fh} - this will force ORA to write to Family Historian.
Optionally, In the next few lines write comments similar to this:
# Author : me
# created/last updated : 1st July 2023
#
# This template writes the birth date, baptism date and place of baptism, and
# then will open up the existing FH source record and write the Citation data
#
# starting from the name field, tab 4 times to get to the birth date entry field
{TAB*4}
Click on the Test button and you should see Output {TAB*4}.
If you click on Matilda's name field in your FH, Refresh the Control Panel with a click on and then click the 1 button on the ORA Control Button, you should see the cursor move 4 steps and end in the Born: field. Watch the Family Historian section in the video below.
OK? If you don't see the cursor move over the Property box, double check that your Autotype template is correct.

 Write something in the reminder box, like, Start with the Family History cursor on the Individual's Name on their Property Box Records. ( ie at the end of Matilda's name) You can always come back to this field and add extra reminder lines.
In the first line of the Template, type {target=fh} - this will force ORA to write to Family Historian.
Optionally, In the next few lines write comments similar to this:
# Author : me
# created/last updated : 1st July 2023
#
# This template writes the birth date, baptism date and place of baptism, and
# then will open up the existing FH source record and write the Citation data
#
# starting from the name field, tab 4 times to get to the birth date entry field
{TAB*4}
Click on the Test button and you should see Output {TAB*4}.
Write something in the reminder box, like, Start with the Family History cursor on the Individual's Name on their Property Box Records. ( ie at the end of Matilda's name) You can always come back to this field and add extra reminder lines.
In the first line of the Template, type {target=fh} - this will force ORA to write to Family Historian.
Optionally, In the next few lines write comments similar to this:
# Author : me
# created/last updated : 1st July 2023
#
# This template writes the birth date, baptism date and place of baptism, and
# then will open up the existing FH source record and write the Citation data
#
# starting from the name field, tab 4 times to get to the birth date entry field
{TAB*4}
Click on the Test button and you should see Output {TAB*4}.
 If you click on Matilda's name field in your FH, Refresh the Control Panel with a click on
  and then click the 1 button on the ORA Control Button, you should see the cursor move 4 steps and end in the Born: field. Watch the Family Historian section in the video below.